Thursday, February 5, 2009

Lets vote for our next swap :)


Ok I am going to put a pole up on my blog for the next swap .. You will have 4 things to choose from. So lets vote and you.... my little swappers will decide what you want our April swap to be :) I am going to throw out 4 ideas.... Plus I want to do an apron swap in April also :) Details on that later ;)

1. A Siggy quilt block exchange... 12... 12X12 blocks so we can each make a lap quilt :) Blocks and self address envelope to me. I will divide them. (you sign the center block) I will post instructions if this idea is chosen.
This is what a siggy block looks like ;)

2. A handcrafted Cloth Doll... I have a PDF for a fun one we can use ;) Or I could take suggestions on the doll pattern..but I would like us all to make the same style :)
I would love for us to make simple cute Annie's :)
Here is the Annie that I had in mind ;)

I will send everyone the PDF for her...........

If that is what wins the votes for our next swap:)


This is one of the patterns featured on Creative Living with Sheryl Borden


3. A handcrafted Back Pack with small pouches to put in it.

4. Recycle a Dress or Long skirt into an Apron... Everything used must be up cycled... Embellishments included... Only new item Thread. Now this is my kind of fun :)
So theses are my ideas... lets have some fun and vote on the one you want :)

Also I am going to hold a Christmas in July Ornament swap... it will be 10 handmade ornaments. You can start on those now... I will Post the sign ups the last of May :) I think I will hold this swap as follows... you make your items and ship them to me... There will be a fee to sign up through my pay pal or check/money order when you send the items out to me... The fee is so I can re-ship the items out to everyone. I was in one where the Hostess requested $20.00 and it was lots of fun. I didn't mind sending the extra money because you received some really wonderful items back. I think there will be a limit on the amount of swappers... I think it will be limited to 30. So it will be first come first served on the ornament swap. Then the last part of August I am going to hold a Halloween Swap the same way...with handcrafted Halloween Items/Ornaments... so keep an eye out!!! I am still going to hold apron swaps too!!!! Not to leave out my apron lovers!!! I just like to try new things... Keep the excitement and fun coming all year round :)

My Partners Valentines Day Apron has arrived :)

I just had to post my Apron that I made for my Partner Nadine... she has posted me and told me she has received it. :)
LOL Prudence was for her...... she hoped it was for her when she read my blog... Well what was I to do when she gave me this HUGE HINT IT LARGE LETTERS IN A PERSONAL e-mail!!!!! I could not allow her to be sad!!! So I made Prudence Thimblebottom for her...:) In addition I added one of my own design handcrafted pincushions :)

LOL here is what she said when she saw the two of them together:
The Owl and The Pussy Cat!!! ..... what a quick wit.... I never even thought of that!!! Wonderful!!! just Wonderful!!! .. Oh by the way thank you for all the emails helping me fix my bias trim problem.... I just love you girls..... :) :) So without further delay here is the apron that you sweet ladies helped me on......


Ok this Sneaky Dress Form must have been out partying all night again... she absolutely!!!! must stay away from the hooch... every time I try and take a photo she is on the tilt!!!! LOL I really do need to fix that or purchase a new one!!!

Wednesday, February 4, 2009

Why do men love women in leather?????


When a woman wears a leather dress, A man's heart beats quicker, And his throat gets dry, He goes weak in the knees, And he begins to think irrationally. Ever wonder why?

IT'S BECAUSE SHE SMELL'S LIKE A NEW TRUCK!!!

Cup Cake Apron Swap... Swap-Bot

I joined in on a fun Cupcake apron swap on Swap-Bot. Here is the wonderful fun apron that our sweet Val sent me. I love the handcrafted cupcake on the front of this wonderful apron. I don't know if it shows or not but there is hand-sewn sequins and beads on that lovely frosting on this sweet confection. I swooned over the large pocket on the front.. Val sectioned it off in four separate pockets... very functional in my book... Way to go Val!!!! You rock GF :) Last year... I always got Jenn from Lip Stick and Laundry as my swap partner. For some reason this year.....I always seem to get Val as the person that sends to me ;) I don't mind.. she always sends fun and fantastic aprons. :) So here it is.................
Below are my fun extras :)
Thanks Val!!!
The apron I made for my swap partner is here:


I hope she likes it :) I know I have been making a lot of these same little aprons...but they always turn out so darn cute!!!! I know I should really make different ones...but for some reason.. I always make this pattern... and change it a bit :)

Here is a Fantastic Apron!!!!

I feel in love with this Artisans Steam Punk Apron... I think I Have to make me one of these.. isn't it fun and different???


Jannypies... sewing/ Craft center .. check this out fantastic!!!!

DIY Craft Desk

Costs & Materials:
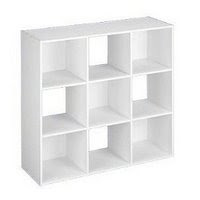
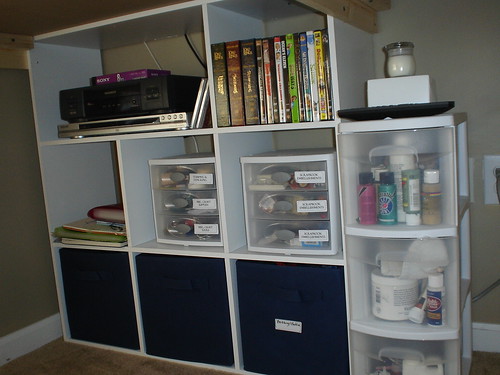
2 of these Cubicle Storage units from Target $50 now, I spent $40. 1 sheet of MDF, 1" thick, about $25 at Home Depot 4 1x4" boards $2 each Home Depot 2 Table Legs (I actually used 2 railing things, cause I liked the shape of them) $2 each HD White Primer and Paint Screws

Photos of the project: BEFORE- $35 desk from Craigslist, sheet covered table.
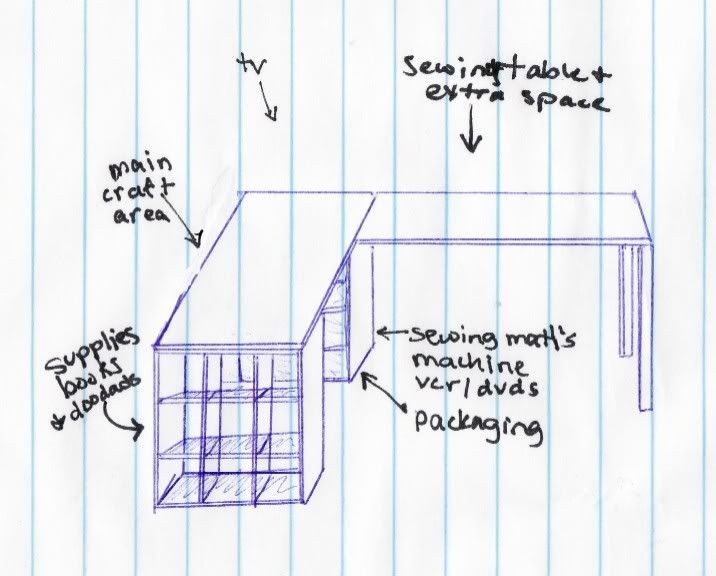
Idea sketch of new desk design.
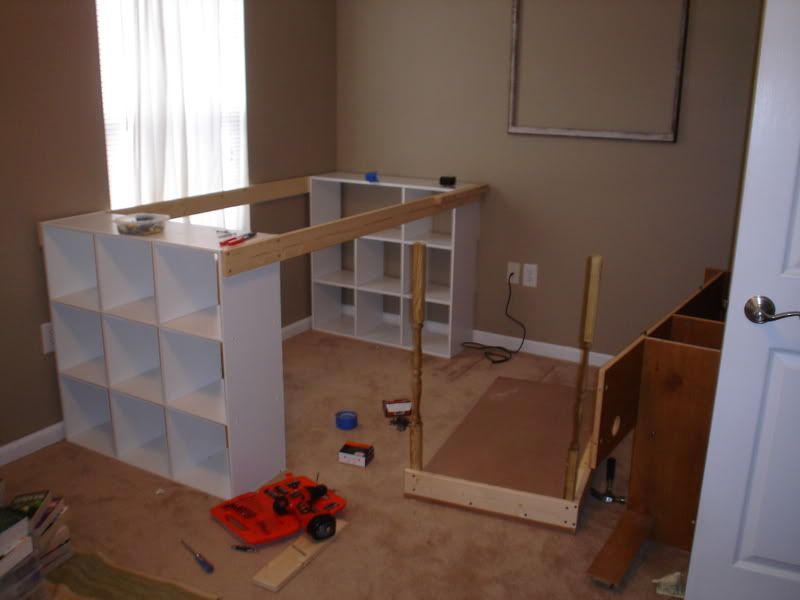
During assembly - I first put together the cube shelves and then attached them with 2 1x4" boards. This was to make it stable and not let the MDF top sag in the middle. On the L side, I attached the legs and more 1x4s around the edges.Painted and sealed -
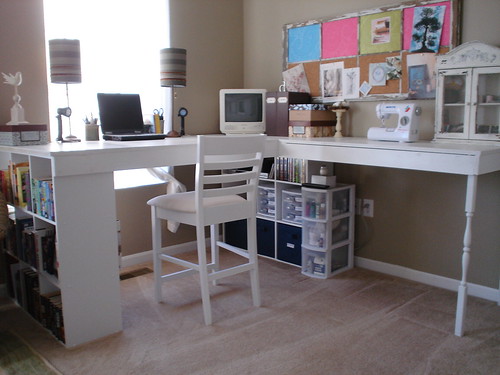
I attached the tops and then painted it and sealed with varnish.
It really didn't take much time at all, once I had it planned out and the parts purchased. Buying two $50 shelves from Target makes it about $150 total in price, so you can definitely find pre-made desks for that amount. However, they will not be nearly as large or with as much storage or as well-built (mostly will be the cheap laminate wood). Also, I absolutely loved the challenge of designing and building something this large all by myself, no help from my husband or anyone. It was completely worth the cost for that feeling of accomplishment!
After finding this tutorial.. I now know that I am getting rid of my saw horse table legs for my tables in my sewing room and going for these book shelves from Target...besides everyone that has been following along on the journey of my new sewing room knows I could sure use the room for storage ;)
I hope you find this item very useful.. I know I sure did :)

Tuesday, February 3, 2009

Putting a Smile on Dads Face

I was at my dads a while back and we were sitting around eating dinner and talking. I was telling Dad and Kathy all about the Christmas stockings that I made for my family members out in CA. I have to mention...( I cross-stitched very elaborate stockings for Dad and Kathy several years ago... I lined them and back them in Velvet..they were very nice... took a year to cross stitch and sew them together!!! ) Well anyway.. we got to talking about me making aprons and how nice they were. Dad said he wanted me to sew him something... I asked what he had in mind... well he thought he would like an apron. He wanted a work apron, so he could put his tools, pencil, cell phone, and Ipod in. He says he is always getting grease or something on his shirts and pants. So I told him sure ....I would be happy to make you one. Of course dad is like me, use what you have around... Recycle!!!! So that is just what I did. I used left over baby blue jean bibs.... I made dad a butchers apron out of up-cycled blue jeans. I added tons of functional pockets and some not so functional. I even lined it with canvas so it would be more durable. The tie on the back was a nylon dog leash cut in half :) I zig-zag-ed all the seams together. I have to admit I ran out of the darker blue jean color material...but dad was ok with that... he just loved the apron. Dad says its a one of a kind and that is what makes it all the more special :) Aweeee sweet Daddy!!!! He uses it all the time. So with out further A-DO here it is:


Look at this happy little smile on his face. Dad has pockets for his cell phone, pencil, tools, Ipod... he is just a happy little ole man!!!!!

Here is a closer photo of all the pockets ;)

Make your own Fabric Envelopes

This crafting item take from Wendy S. who posted to Craftstylish :)

These fabric envelopes can be made in any size. The idea here is that the fabric will be folded into thirds to create the envelope. Stitch up the sides and affix a closure in a snap!


Materials:• Fabric (for a quick project, choose a no-fray fabric like felt, vinyl, or Ultrasuede)• Rotary cutter and mat• Ruler• Scissors• Sewing machine• Embroidery floss and needle for the quilted version• Optional: closure of choice (snaps, hook-and-loop tape, magnetic closure), buttons, beads, patches, ephemera, pinking shears

For longer crafternoon sessions, use up your scraps to make a quilted version. Use a 14-inch x 6-inch strip, machine- and hand-sewed the binding on, then sewed up the sides with embroidery floss via the whipstitch.
For a faster project, choose a no-fray fabric like felt, vinyl, or Ultrasuede. For quick "felt-velopes," I cut a sheet of felt to a 6-inch width x 12-inch length, folded it in half lengthwise, and used the angles printed on the cutting mat for even points, then eyeballed the two folds.
Fast and no-fraying felt version. Cut to a quick chase by using the angle lines on the mat to cut points at each end: one inverted and one pointed out.
Place a differrent color thread in your bobbin from the topstitching thread, and you can quickly change colors by flipping the project when you are sewing up the sides.
I used red for my topstitch and black in the bobbin, then flipped the project to switch up the color and add more texture.
This project also offers a great opportunity for practicing hand-stitching, too. Little x's and french knots look super sweet running up the sides. Depending on what you are planning to put into these little sweeties can also determine the size. The envelopes may be added to heirloom treasure troves, glued inside of scrapbooks, or popped into hope chests. For the envelopes you've spent more time on, consider putting in copies of old family photos or keepsakes. These are awesome for wedding mementos, birthday gifts, and cards.
Practice = Project! I sewed a panel of yellow and orange scraps together and practiced free-motion quilting. I closed up the sides and added a smattering of buttons. Sweet!

Ok I have to show you my latest OWL


I would like you to meet Prudence Thimble-Bottom. Isn't she sweet???? She is off to a new home right now as I type this note. I just could not wait any longer to show her off!!!! I hope her new owner is surprised, and swoons over her and loves her. I had a lot of fun making Prudence for this surprise owner :) I am just certain her new owner will love her!!! Whats not to love????
Prudence's new owner is so talented when it comes to crafting and sewing..... I hope she adds a bit more embellishments to Prudence. As I am not too good in that department. If she does add more to her.. I will post a new photo of her for everyone to see :) That is if I get a new photo, so I can share :)

Sunday, February 1, 2009

Make Your Own Large-Spool Stand

You can easily make this large spool stand and cover. The idea is so simple, and it makes those large bobbin spools super-easy to handle.
Step 1: Here is a picture of the plastic post before (black) and after (white) it has been cut by a third.
Step 2: Drill a hole in the center of the top.
Step 3: Pull the thread through the hole in the top.

Step 4: Replace the cover, and you're ready to go!

You'll need:
A large, empty spool from a package of CDs
Scissors or a knife
A drill
A large spool of thread
Sewer's Aid
Here's how you make it:
Step 1: Cut the plastic post down by a third.
Step 2: Use an electric drill to make a hole in the top of the cover.
Step 3: Put a large spool on the post, and thread the bobbin thread through the hole in the cover.
Step 4: Put the top back on, and your new thread stand is ready to use. This is a great way to store your bobbin thread because it won’t get dusty. You can also use this thread stand to manage tricky thread. Put some Sewers Aid on the edge of the hole, and it will lubricate the thread as it spools through the hole and into your machine.