Between 18 and 22, a woman is like Africa, half discovered, half wild, fertile and naturally beautiful!
Between 23 and 30, a woman is like Europe, well developed and open to trade, especially for someone with cash.
Between 31 and 35, a woman is like Spain, very hot, relaxed and convinced of her own beauty.
Between 36 and 40, a woman is like Greece, gently aging but still a warm and desirable place to visit.
Between 41 and 50, a woman is like Great Britain, with a glorious and all conquering past.
Between 51 and 60, a woman is like Israel, has been through war and doesn't make the same mistakes twice, takes care of business.
Between 61 and 70, a woman is like Canada, self-preserving, but open to meeting new people.
After 70, she becomes Tibet, wildly beautiful, with a mysterious past and the wisdom of the ages...only those with an adventurous spirit and a thirst for spiritual knowledge visit there.
THE GEOGRAPHY OF A MAN
Between 1 and 70, a man is like Iran , ruled by nuts.

Saturday, February 28, 2009
Frilly Reversible Apron

Copy and enlarge the pattern pieces found at the end of the instructions as indicated.
Cut out the apron pieces as directed. Set them aside.
Place fabric A, unfolded, on the work surface. Refer to figure 1 to get all the pieces out of 1 yard (90 cm) of material. Pin the front bottom to the fabric, and mark the bodice, casing, and bias strips for the ruffle. Cut out all the pieces.

Place fabric B, unfolded, on the work surface and repeat.
Place the complementary fabric, folded widthwise, on the work surface and, using the schematic in figure 2, cut out the drawstrings, neck straps, and ties. Cut out the single waistband last, unfolding the fabric to get enough material.

To make the neck strap, press 1/2" (1.3 cm) under on each long edge. Fold the strap in half lengthwise and press. Topstitch along each edge.
To make the ties, fold each in half lengthwise and press. Open the fold, and press each edge in toward the center. Fold again along the original pressed fold, and topstitch along each edge.


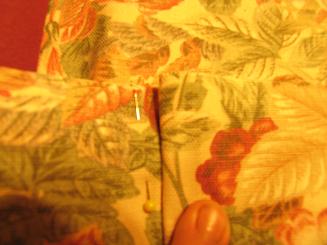
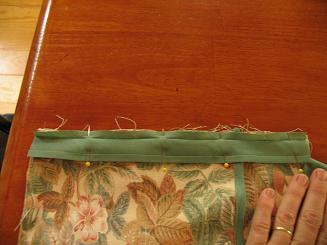
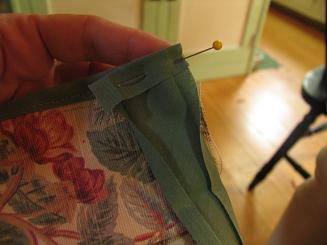
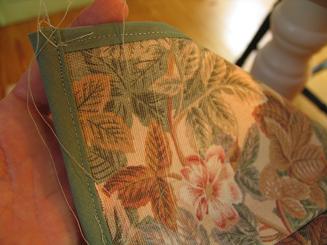
Pin both bodice pieces together, with right sides together, aligning the seams and matching the center points. Beginning and ending 1/2" (1.3 cm) from the bottom edge, stitch along the sides and top, leaving the entire bottom open, being careful not to catch the ties or straps in the stitching (figure 5). Trim the seam of the casing only, at the buttonholes, to 1⁄8" (3 mm) to allow the ties to come from either side. Reinforce the stitching at the upper corners of the casing. Turn it right side out.

To create the channel for the ties within the casing, pin across the top of the casing, and topstitch close to the edge. Thread the ties through one buttonhole to the right side, and pin in place in the center of the channel. Using a zipper foot if necessary, topstitch along the bottom of the casing as close to the existing seam as possible.
Knot the ends of the ties. (When you reverse the apron, untie the knots and slip the ties through the buttonhole on the other “right“ side of the casing. Knot them again to secure.)
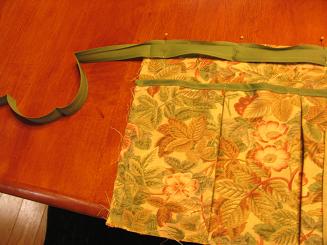
Mark the center points of the bottom edge of the bodice pieces. Gather the bottom edge of the bodice pieces, using long basting stitches.
Making the Ties & Waistband
For the ties, first cut the two 24" x 16" (61 cm x 40.6 cm) tie pieces in half lengthwise to yield four 24" x 8" (61 cm x 20.3 cm) pieces. Stack and cut them again to yield eight 2" x 4" (61 cm x 10.2 cm) pieces.
For the waistband, cut the 16" x 8" (40.6 cm x 20.3 cm) waistband piece in half lengthwise to yield two 16" x 4" (40.6 cm x 10.2 cm) pieces. Mark the center point of each waistband piece.
Construct the first waistband/tie with four tie pieces and one waistband piece. Stitch the two tie pieces together along the short edges, right sides facing. Repeat for the other two pieces.
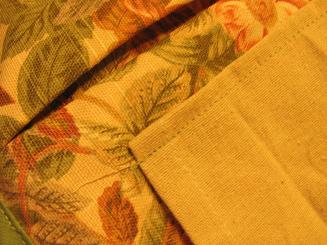
Sew the waistband between these pieces, right sides together, leaving the side seam open 1/2"(1.3 cm) on either side of the bottom of the waistband (the edge that you’ll sew to the front bottom). See figure 6. Repeat to make the second waistband/tie, but stitch all the seams completely.

Stitch the first waistband/tie piece—the one with the open seam—to the bodice, with the right side together with the fabric A side, along the top of the waistband section only, gathering the bodice to fit and matching side seams and center points. Begin and end the stitching at the 1/2" (1.3 cm) seam left open in step 11 (figure 7). Repeat for the reverse side of the waistband/tie and the bodice.

With the bodice inside out and the right sides of the waistband/tie together, stitch the long edges and short ends of the ties together, stitching to the 1/2" (1.3 cm) side seam left open on the waistband in step 16, and leaving the front section free. Trim the seams, and turn the waistband/tie right side out. Press it down.
Cut out the apron pieces as directed. Set them aside.
Place fabric A, unfolded, on the work surface. Refer to figure 1 to get all the pieces out of 1 yard (90 cm) of material. Pin the front bottom to the fabric, and mark the bodice, casing, and bias strips for the ruffle. Cut out all the pieces.
Place fabric B, unfolded, on the work surface and repeat.
Place the complementary fabric, folded widthwise, on the work surface and, using the schematic in figure 2, cut out the drawstrings, neck straps, and ties. Cut out the single waistband last, unfolding the fabric to get enough material.
To make the neck strap, press 1/2" (1.3 cm) under on each long edge. Fold the strap in half lengthwise and press. Topstitch along each edge.
To make the ties, fold each in half lengthwise and press. Open the fold, and press each edge in toward the center. Fold again along the original pressed fold, and topstitch along each edge.
Pin both bodice pieces together, with right sides together, aligning the seams and matching the center points. Beginning and ending 1/2" (1.3 cm) from the bottom edge, stitch along the sides and top, leaving the entire bottom open, being careful not to catch the ties or straps in the stitching (figure 5). Trim the seam of the casing only, at the buttonholes, to 1⁄8" (3 mm) to allow the ties to come from either side. Reinforce the stitching at the upper corners of the casing. Turn it right side out.
To create the channel for the ties within the casing, pin across the top of the casing, and topstitch close to the edge. Thread the ties through one buttonhole to the right side, and pin in place in the center of the channel. Using a zipper foot if necessary, topstitch along the bottom of the casing as close to the existing seam as possible.
Knot the ends of the ties. (When you reverse the apron, untie the knots and slip the ties through the buttonhole on the other “right“ side of the casing. Knot them again to secure.)
Mark the center points of the bottom edge of the bodice pieces. Gather the bottom edge of the bodice pieces, using long basting stitches.
Making the Ties & Waistband
For the ties, first cut the two 24" x 16" (61 cm x 40.6 cm) tie pieces in half lengthwise to yield four 24" x 8" (61 cm x 20.3 cm) pieces. Stack and cut them again to yield eight 2" x 4" (61 cm x 10.2 cm) pieces.
For the waistband, cut the 16" x 8" (40.6 cm x 20.3 cm) waistband piece in half lengthwise to yield two 16" x 4" (40.6 cm x 10.2 cm) pieces. Mark the center point of each waistband piece.
Construct the first waistband/tie with four tie pieces and one waistband piece. Stitch the two tie pieces together along the short edges, right sides facing. Repeat for the other two pieces.
Sew the waistband between these pieces, right sides together, leaving the side seam open 1/2"(1.3 cm) on either side of the bottom of the waistband (the edge that you’ll sew to the front bottom). See figure 6. Repeat to make the second waistband/tie, but stitch all the seams completely.
Stitch the first waistband/tie piece—the one with the open seam—to the bodice, with the right side together with the fabric A side, along the top of the waistband section only, gathering the bodice to fit and matching side seams and center points. Begin and end the stitching at the 1/2" (1.3 cm) seam left open in step 11 (figure 7). Repeat for the reverse side of the waistband/tie and the bodice.
With the bodice inside out and the right sides of the waistband/tie together, stitch the long edges and short ends of the ties together, stitching to the 1/2" (1.3 cm) side seam left open on the waistband in step 16, and leaving the front section free. Trim the seams, and turn the waistband/tie right side out. Press it down.
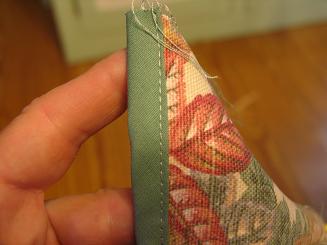
Construct a ruffle by cutting strips from fabric A on the bias (figure 1) and piecing them to get one strip 110" (2.8 m) long. Repeat to construct a second ruffle from fabric B. With the right sides facing, stitch the ruffle pieces together, leaving one long edge open. Trim the seam, turn it right side out, and press it down. Mark the center point of the ruffle.
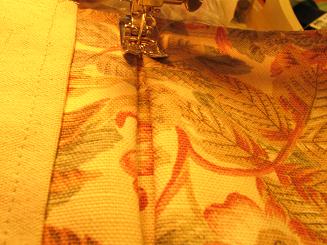
Gather the raw edges of the ruffle using two rows of basting stitches. Pin them to the bottom of one front bottom piece, beginning and ending 1/2" (1.3 cm) from the side edge. Connect the fabric A side of the ruffle to the front bottom of fabric B. With the marks aligned and the raw edges even, baste the ruffle to the front bottom piece. Trim the seam.
With the right sides facing, pin and stitch both front bottom pieces together along the sides and hem, leaving the waist open. Begin and end the seam 1/2" (1.3 cm) below the waistline.
Pin the fabric A front bottom piece to the same side of the fabric A bodice, right sides facing. Stitch them together.
Turn and press under the seam allowance on the remaining waistband/tie. Place it on the 1/2" (1.3 cm) seamline of the fabric B front bottom piece, and slipstitch the opening closed. Decide which pretty side you feel like showing off today, cinch it on, and give a little sashay because you look so good!
Pattern Template


1 yard (90 cm) of muslin
Tear-away stabilizer
Thread
Tools & Supplies
Access to a photo copier that enlarges images
Rotary mat, clear ruler with 45° angle lines, and cutter
Fabric shears
Scissors
Pins and needles
Tape measure
Sewing machine
Iron and ironing board
Seam ripper
Water-soluble fabric pens
Seam Allowance
1/2" (1.3 cm)
Gather the raw edges of the ruffle using two rows of basting stitches. Pin them to the bottom of one front bottom piece, beginning and ending 1/2" (1.3 cm) from the side edge. Connect the fabric A side of the ruffle to the front bottom of fabric B. With the marks aligned and the raw edges even, baste the ruffle to the front bottom piece. Trim the seam.
With the right sides facing, pin and stitch both front bottom pieces together along the sides and hem, leaving the waist open. Begin and end the seam 1/2" (1.3 cm) below the waistline.
Pin the fabric A front bottom piece to the same side of the fabric A bodice, right sides facing. Stitch them together.
Turn and press under the seam allowance on the remaining waistband/tie. Place it on the 1/2" (1.3 cm) seamline of the fabric B front bottom piece, and slipstitch the opening closed. Decide which pretty side you feel like showing off today, cinch it on, and give a little sashay because you look so good!
Pattern Template
Skill Level
Intermediate
Materials
Pattern (found at the end of the instructions)
1 yard (91.4 cm) each of two fabrics—A and B—for the reversible bodice and front bottom
1 yard (90 cm) of a complementary fabric for the neck strap, waistband, ties, and drawstrings
Intermediate
Materials
Pattern (found at the end of the instructions)
1 yard (91.4 cm) each of two fabrics—A and B—for the reversible bodice and front bottom
1 yard (90 cm) of a complementary fabric for the neck strap, waistband, ties, and drawstrings
1 yard (90 cm) of muslin
Tear-away stabilizer
Thread
Tools & Supplies
Access to a photo copier that enlarges images
Rotary mat, clear ruler with 45° angle lines, and cutter
Fabric shears
Scissors
Pins and needles
Tape measure
Sewing machine
Iron and ironing board
Seam ripper
Water-soluble fabric pens
Seam Allowance
1/2" (1.3 cm)
Petal Apron Pattern - Vintage (1959)
 This pattern is a three petal apron found in an old WorkBasket magazine.
Directions:
Make pattern from chart, allowing each square to equal one inch.
Center one petal over the other two. Gather all three across top until measurement is about 15 inches and add to waist band.
Trace a pansy on lower portion of each petal and embroider in natural colors.
*Note: The directions don’t mention finishing the raw edges of each petal but I would do so with a narrow hem before attaching to the waistband, you could also add an extra bit for seam allowance before cutting.

Source: The WorkBasket, October 1959

Friday, February 27, 2009
Time Flys
 Wow where has the week gone??? I haven't posted a thing in 4 days!!! It seems like life just picks up and carries us away sometimes into that black void I call the Great Nothing-Ness. I know I spent one entire evening before I went to bed working on my Siggy Quilt blocks. I got my 60 completed and then turned around and signed up for round 2. I think its pretty cool to get quilt blocks from all over the world. The blocks that I will received will be awesome. I look forward to the colors, the location of each participant, the personalization of each block. I am sure these blocks will make a fun and interesting quilt. Each participant is to put his or her state and/or Country on their block. It will be exciting to see how many countries are in this set of 60 blocks. :) I am excited to start the second set. This is my first quilt block swap and in fact I haven't done much piecing of quilts. Let me back up on that... I have sewn blocks before but they were all wonky and I could not figure out how come. I have done a lot of reading, watching videos, and TV programs on how to quilt. I have discovered its a very precise sort of craft. No fudging... I had to throw out several of my blocks because they were wonky. But I am happy to do that if I learn from my mistakes.. I hope to do more piecing of blocks and quilting.... as everyone knows. I have to put my lazy Grace to work :)
I never posted the photo of the Owl that Carla won :) Isn't it cute????
Monday, February 23, 2009
Recipe of the cake I had for my Birthday :)
 Sorry No Photo of Cake... the rose is because I am over the hill :)
I had this very very yummy cake for my Birthday....My step mom Kathy always makes this cake for me now!!!! I thought I would share the recipe with you :) I use to be a Chocolate only sort of Cake girl... but after eating this cake ... This is the only Cake I want to eat :) It's very very good!!!!
German Bunt Cake
Ingredients:
1 Yellow cake mix
1 Small Pkg of Vanilla Pudding
3/4 Cups oil
3/4 Cups water
1 Teaspoon of Vanilla
1 Teaspoon Butter Flavoring
Mix all of the above well. Add Four eggs, Beat after each egg with mixer on high speed, or a total of 8 mins mixing.
While cake is mixing:
Mix together:
1/4 Cup White Sugar
1/4 Cup Finely Chopped Pecans
2 Teaspoons Cinnamon
Put Layer of cake mix (1/3 of batter) in Bundt Pan (or angle food pan) Then sprinkle 1/3 of sugar mixture over the batter. Layer this way for three layers.
Bake at 350 degrees for 60-65 mins.
While cake is Baking:
Mix: 1 Cup Powdered Sugar
1/2 Teaspoon Vanilla
1/2 Teaspoon Butter Flavoring
3 Tablespoons cream or milk
Let cake cool for 1 hour. Remove from pan and pour Frosting mixture over the warm cake.
Slice and enjoy....
I like mine when Butter Pecan Ice cream :)
My Pink Apron is here ;)

I entered a Contest back in Oct on Itchin2BStitchin's blog.
I won I won!!!!
Thank you Tracey for such a wonderful apron :)
Tracey was promoting Breast Cancer Awareness. So she held a drawing for a pink apron. I think it was a school project.. But I loved the idea of educating women in women's health issues. As I am a survivor or cancer. Not breast cancer but cervical cancer. So its important to spread the word to have your yearly checks. I know I get mine!!!!
It did take awhile to received this lovely apron but it was worth every minute I had to wait on it. Tracey has had a lot on her plate since the drawing, School, work, husband, travel for work and if I remember correctly a family member's serious illness.
I didn't mind waiting...Things happen to the best laid plans... we all know this :) I always say better late than never :) Once again... Thank you Tracey for such a wonderful pink apron :) I love it!!!! The great thing about getting the apron now.. is ......it came during one of my rough weeks on my new job... it was almost like a gift from no where.. just one of those pay it forward type ;) I know it sure made me smile ... and let the bad things from the day melt away :) For that I thank you very much Tracey.
Ok I am going to talk about this lovely apron......Isn't it fantastic... its a sewing apron.. if you look really close you will see a holder for my scissors.. (oops can't see it on the photo I swiped from Tracy's blog) the item..... that I always seem to loose track of when I sew. The scissors are always under something I have put down on top of them. Never to be seen again until I clear off the cutting or pressing table. Now I will have them where I can find them :)
I just love the pink color combinations... and the very girly ruffle at the bottom. Long apron ties..... I will tell you this apron is very well put together, interfaced, lined, and just plain cute!!!! I am a very lucky girl to have such a nice apron :) Thank you Tracey :)
Sunday, February 22, 2009
Swoozie Whistlebottom has a new home :)
Just a quick note... I just wanted to thank all of you for joining in on my name the Owl contest. I had a lot of wonderful suggested names. I was hard to choose one so I used a random number generator. Everyones name was given a number and then I asked the computer to choose a number. Lets say congratulations to Tulsi.
I also choose a Second Name since it is my Birthday :)
... it was Carla :)
So lets say congrats to her too:)
Carla I will make your little owl this weekend and try and have her out in the mail on Tuesday too :) Congrats my loyal follower :)
Saturday, February 21, 2009
Retro Tie Back Apron

Instructions
Make a true bias fold of the fabric, as shown in figure 1.
Make a true bias fold of the fabric, as shown in figure 1.

Copy and enlarge the pattern pieces found at the end of the instructions as indicated.
Cut out the apron pieces as directed. Set them aside.
Transfer the dots on the bottom front pattern onto the fabric. Without pulling or stretching the edges of the pattern pieces, trim all the outer edges to accept the bias tape, and set the pieces aside.
If necessary, splice the bias tape together. Save the spliced bias for binding the outer edges of the apron where the splice will be easier to hide.
With the right sides together, stitch the two neck strap pieces together at the center back. Press and finish the raw edges to prevent raveling.
Attach bias tape to the inner edge of the neck strap. Next, baste the neck strap to the top front, with the wrong sides together.
Bind the top edge of the top front (figure 2), including the bottom edges of the neck strap. Press the top front and the neck strap flat.

With right sides together and the centers of the pattern pieces aligned, stitch the bottom edge of the top front and tie to the top edge of the bottom front (figure 3).

Trim and bind the edges of the seam. Attach bias tape along the remaining edges of the apron, mitering the corners as needed.
Bind the open edge of the pocket, trimming the bias even with the outside edges. Then bind the outer edges of the pocket using a basting stitch and bias tape, mitering the corners.
Position the pocket on top of the skirt, matching the corners to the dots on the pattern, and pin it there securely. Fold the pocket edges under approximately 3⁄8" (1 cm). Stitch the pocket in place using a sewing guage at the beginning, end, and corners if necessary. After putting it on, you’ll be ready to dance across the kitchen in your new favorite apron.
Pattern Template

Skill Level
Experienced Beginner
Materials
Pattern (found at the end of the instructions)
1 yard (91.4 cm) of floral fabric
9 yards (8.2 m) of 1⁄4" (6 mm) double-fold bias tape
Thread
Tools & Supplies
Access to a photo copier that enlarges images
Fabric shears
Scissors
Transfer pencils
Pins and needles
Iron and ironing board
Sewing machine
Water-soluble fabric pens
Tape measure
Sewing gauge
Seam Allowance
1/2" (1.3 cm)
Murphy's Law
Do you ever have those weeks where you just wish it was over so you could have your weekend and do what you want????? Well I am lucky I get and extra day off this weekend. I said to myself... Self you have an extra day to sew!!! Yeah!!!!! Well for some reason Murphy is here today visiting me!!! I hate when I have those days no matter how much you want to sew and sew well.... Nothing ever seems to sew right. Crooked Seams, nipped material, don't have everything you need to make the project.... and just plain mentally exhausted. Well that is me today!!!! Dang it!!! I was on such a roll last weekend too!!! But I guess we all have bad sewing days.
I will share with you the item that I made for my dad.
.JPG)
The outside of the MP3 player cover
.jpg)
This is the inside of the MP3 player. I didn't have plastic sheeting so I had to wing it with Satin stitching. I added a snap instead of Velcro.
Dad asked me for this item about the same time he asked me for the apron. I think it turned out less than OK in my book. But my dad will love it anyway. Part of the problem its hard for me to sew on dark material in my dimly lite house. I use extra lighting but sometimes on black it doesn't seem to help much.
She wonders to her self... hummmmmmmmmmmmm I wonder if I need to get my glasses changed????
I know this poor little cover it is not so hot, but my dad will be thrilled that I made it for him. I can tell you if I ever make another one I am changing that pattern big time. Better yet I will have to design one from scratch. The things that I design from scratch seem to work out better for me anyway :) I still don't know if I fully understand the instructions that came with that pattern. There was a lot of this and that's that make absolutely no sense to me. I hate when you get patterns that are not written well.
I guess me and Mr Murphy are going to pop a bag of popcorn and watch a couple of movies and just kick back. My second week at the new job..... I think has kick me in the pants some and I think I just need to vague out tonight :) I purchased a couple movies that I have been wanting to see so I think this just might be the right night to do it :)
Tomorrow is the Big Owl drawing as it is my Birthday :) I am going to have a marathon SAW movie watching day with dad tomorrow. He hasn't seen #4 or #5 and I just purchased #5 last night. I don't like scary movies.. they seem stupid to me...but for some reason I like Saw. I really like that movie Seven with Brad Pitt and Morgan Freemon... fantastic if you haven't seen it ;) So I am off now to watch My Super Ex-Girlfriend, The Women, and if its not too late .. am going to watch Click. I already had a couple of these movies. The Women is new... I have really wanted to see the women after seeing Sex in the City the movie :) I heard there might be a second Sex in the City movie coming out :0)
APP jumps up and down clapping her hands!!!
Friday, February 20, 2009
All Aprons are accounted for :)
.jpg) I just want to thank all of my lovely creative apron swappers for getting all of your wonderful aprons sent out on time. I realize a few of them did not make it on Feb 14Th, but we all know how the snail mail is :) All aprons have made it to their destinations.
I just want to thank all of my lovely creative apron swappers for getting all of your wonderful aprons sent out on time. I realize a few of them did not make it on Feb 14Th, but we all know how the snail mail is :) All aprons have made it to their destinations. I Just want to tell all of you wonderful thoughtful women ... you are all the best group of apron swappers ever :) You all Rock!!!! Each one of you made my job of a Hostess very easy and stress free. So pat yourself on your back ladies!!!!
Each of you really went the extra mile with your aprons and extras. All of of your aprons were fabulous and unique. Wonderful attention to details, fabrics, and trims. I am just blown away at all of the pretty aprons.
I would not have pulled this swap off without your return emails letting me know what was going on. Your responses to my emails were impeccable... I thank you all for the easy job of hosting such an easy apron swap :0) Thank you, thank you, thank you a million times over. I look forward to hosting more swaps... and I hope each and everyone of you join in on the fun :) So lets go sew and create create create!!!!
Thursday, February 19, 2009
"Ugliest Damn Apron"
Nadine just cracks me up ... I had to copy this posting word for word... she is my true inspiration... she is so artistic.. I aspire to be so talented and clever!!! With needles, pins and words... one very funny and talented lady!!! Nadine was my swap partner from my recent Valentines Day Apron Swap. I did not know she was my partner from Lucy's and Shawnee's swap, as you read in a prior post. But I am so tickled to own two of her fabulous creations. I would have been very very thrilled to have just gotten the lovely apron.. but the extras she sent to me... just blows me away!!!!! I am very honored!!!! I will treasure them always :), and I keep my fingers crossed, she will once again be my swap partner in future swaps :) Thank You Nadine :0)
Now for Nadine's Post read it enjoy it and laugh like I did :)
Well, I sent this apron to Marcel (Aunt Pitty Pat's). And it was hard to put it in the mail, 'cause I just wanted to keep it! When I wrote to her to say I had put it in the mail, she mumbled something about how she was sure she would like it. I wrote back and said
"Well....ya know.....there's always the chance you will think it's the ugliest apron ever! It's possible! If that's the case, I'll want you to be sure to pack it right back up, let me know so I can send return postage, and mail it back to me. Actually, I'm pretty sure that's what's going to happen, yep. Dang, I should have included return postage in the package when I mailed it. Better yet, I probably should have just kept the ugly old thing right here with me and not assaulted your eyes with it :-)"
Well, she received the apron today...and look at the e-mail she sent me:"
Nadine... the apron came and its the ugliest damn thing I have ever seen!!!"
Of course, she followed that by saying that if I really thought she meant that, she was gonna come put a "pop knot" on my head for even thinking that, LOL! Now, I don't know what a "pop knot" is for sure, but it doesn't sound good, haha! Here's the apron:

Now, there's a story behind this apron. I had ORIGINALLY made her a DIFFERENT apron. It was a fine apron. Nothing wrong with it. Had pink ball fringe, two layers - it was the A Is For Apron "Cakeland" apron. Did I mention it was fine? Of course, "fine" is not GREAT, but "fine" is pretty good. So then for the extras. I've been making some kind of a bag to put the apron and other goodies in to mail out. So...what to make...what to make? I didn't have enough of the apron fabric leftover to really do justice to any kind of bag.And then I thought - well, heck I guess it doesn't HAVE to be the same fabric, does it? And I had some really fun fabric that I'd gotten awhile back from our local quilt shop. Did anyone catch those "Moda Good to the Last Swatch Scrap Bag" things - they contain approximately "40 color coordinated selvage strips" in a little brown bag for $9.99. Each bag equals about 2 1/3 yards of fabric. They are what's left over from making the 5" squares for Charm Packs. So, they are 40+ one yard long strips, 2 to 4 inches in width, representing the "edges" on each side of the lengthwise portion of fabric, and include both selvages - the "plain" one and the one with the maker's marks on them. They are cuter than snot :-) And I know about snot, because I've had a nasty cold/flu bug for over a week now!I had bought all five of the available assortments (five little brown bags) and one was Valentine fabrics - again, they are all coordinated so you can just toss 'em together. So I decided to make a bag from those strips (rather than hoarding them until they rot into the ground like I tend to do with some fabric - "Oh, but if I use them, then they'll be gone and I won't have them anymore!!!" hahaha). Well, the bag turned out soooo darned cute that the original apron just looked like poop to me. Soooooo THAT apron is languishing in a corner, and I made a totally NEW apron using the strips. Hubby actually helped with the "planning" because I didn't use a pattern and he had some good ideas. I got both the bag and an apron out of the little brown bag, and I STILL have some left over! I'm thinking that $9.99 was a pretty good deal! I added some elegant black chiffon ruffle to the hem. Notice the ties are made with the selvages showing:

And I used some of the selvages in collage for the pocket:

Here's the bag:

 And a close-up of the fabric flower on the bag, with buttons-and-pearls stamens spilling out of it - heck, I just make this stuff up sometimes! Must be the two glasses of wine I had.....I added one of my "Weads" necklaces in a ribbon bag, and also a copy of Apronology.
 Now, is that just the ugliest damned apron you've ever seen, or what?
Underwear Dust
 One evening a Husband, thinking he was being funny, said to his wife, 'Perhaps we should start washing your clothes in 'Slim Fast'. Maybe it would take a few inches off of your butt!'
 His wife was not amused, and decided that she simply couldn't let such a comment go unrewarded.
The next morning the husband took a pair of underwear out of his drawer. 'What is this?' he said to himself as a little 'dust' cloud appeared when he shook them out.
'April', he hollered into the bathroom, 'Why did you put Talcum Powder in my underwear?' She replied with a snicker. 'It's not talcum powder; it's 'Miracle Grow'!!!!!!
Hello Good Thursday Morning :) Joke ...hee hee hee
A DEA officer stops at a ranch in Texas , and talks with an old rancher. He tells the rancher, 'I need to inspect your ranch for illegally grown drugs.'
The old rancher says, 'Okay, but do not go in that field over there' as he points out the location.
The DEA officer verbally explodes saying, 'Mister, I have the authority of the Federal Government with me.'
Reaching into his rear pants pocket, he removes his badge and proudly displays it to the farmer.
'See this badge? This badge means I am allowed to go wherever I wish...on any land. No questions asked or answers given. Have I made myself clear? Do you understand?'
The old rancher nods politely, apologizes, and goes about his chores. A short time later, the old rancher hears loud screams and sees the DEA officer running for his life chased close behind by the rancher's prize bull. With every step the bull is gaining ground on the officer, and it seems likely that he'll get "horned" before he reaches safety. The officer is clearly terrified. The old rancher throws down his tools, runs to the fence and yells at the top of his lungs.....
'Your badge! Show him your badge!'
Monday, February 16, 2009
Floral garden apron with pockets
 I am always losing my pruning shears and other gardening tools so I started looking for a cheap apron I could use while gardening. The only ones I found were ugly and expensive so I decided to make one. It was fairly easy and inexpensive to make and I haven’t lost anything since I started using it.
 Materials Needed:
1 yard of fabric
seam binding
1 yard of fabric
seam binding


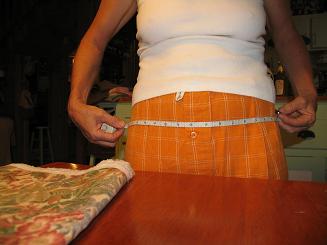
Step 1. To determine how big to make your belt measure the distance between your hip bones and add two inches on each side. The width will be determined by how deep you want your pockets to be. I made mine about 12 inches wide.
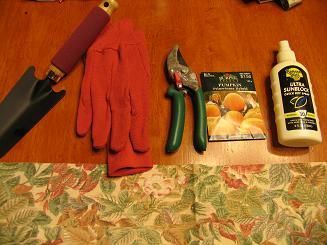
Then lay out all the things you want to carry in your apron so you can determine how many pockets you will need.


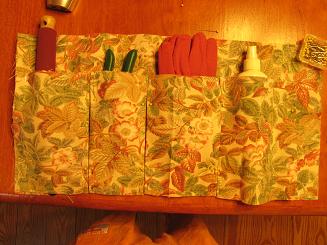
Step 2. Cut a second piece of fabric two inches shorter and twice as long as your bottom piece. The extra length will give you enough fabric to make the pleats you will need to give your pockets enough room to hold your tools. You will need to make pleats by making a fold on both sides as shown in pictures. Pin the pleat in place and repeat for each pocket.
I added a contrasting pocket to the outside of center pocket as shown in last picture.

Step 3. Pin seam binding to top of pocket piece of fabric and then stitch into place.

Step 4. Fold bias tape over to cover seam and stitch into place as shown.

Step 5. Place pocket piece on top of bottom piece and stitch along bottom edge securing each pleat as you go.

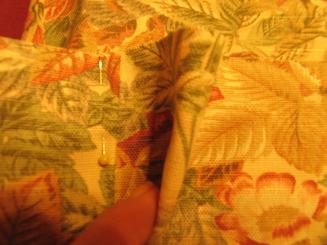
Step 6. Stitch the inside of each pleat to secure the pockets to the back piece.

Step 7. Stitch seam binding to both sides of apron. Fold it over and stitch into place.


Step 8. Pin seam binding to bottom of apron as shown. Stitch. Fold over and stitch into place.

Step 9. Stitch seam binding to top of apron leaving extra seam binding on each end to use as ties. Fold over and stitch as shown in picture.
window. Share and Enjoy:
Taken from NotToCrafty.com
2nd Doll Ready to Drop :)
.JPG)
I would like to introduce you to Roxie Pendergrass.
I had so much fun making my other little doll that I just had to make another one. I was hoping I could make one doll a month :) More if time allows. I am now caught up on my two needed dolls for the year :)
I would like you to know that this doll is made from scratch and from my own designs. I hope to get better as I make more of these darling little girls. Next toy I make..... needs to be a boy toy. Do any of you have a pattern for a robot or something that would work for a boy. HA!!!! I just had a scathingly brilliant idea!!! I could make a rocket!!! Yes that is what I will make next month, a rocket for a little boy.
As you all know I have my poor little snail up there that has only moved once. It shows how many Christmas Presents I have made so far this year. Yes... Yes... I know I need to get busy and start working on those now. :) I have only one other thing that is a must to sew on my last day off from work tomorrow ... that is my apron for Booming Aprons Apron Swap :) It's for St Paddy's Day :) Then during the week I will work on the rest of my Quilt blocks.. I didn't work on those at all this weekend. But they are not due until Tax Day :) So I have lots of time to work them ;) I think this next weekend, will be a four day weekend. I get Presidents day off for holiday. I always have Mondays off so... I get to choose another day off. I chose to take a day off close to my Birthday so I could have a long weekend :) Which means more blogging and sewing time :) Yeah!!!!!!
Toy Drop #1
I just could not wait for an answer to my question about my sweet Amy Merriweather :) I was so excited....I just had to take her and give her away right now!!!! I dropped her off at my local small town Library. The parking lot was packed full of cars. So I am sure she will find a home today :) I have added Photos of her and where I left her for your enjoyment :)
I had so much fun with this... I can't wait to make another toy. I am pretty excited to see if someone responds to rescuing her ;) Only time will tell... I hope it doesn't take too long, because I am an instant gratification sort of gal!!!!! (OH MY)
.JPG)
.JPG)
I tell you I am very excited about doing this toy drop. It is a wonderful way to brighten up someones day. I know it sure made me feel better after having so many rotten days lately. I just smile when I think of someone rescuing my little Amy Merriweather, and giving her a great home.
I was reading on the Toy Society blog where a lady was having such a rotten day. When all of a sudden she found a toy and it put that smile back on her face. It made all the big bad things of the day melt down to small things. So ladies if you want to do something fun and meaningful.. join in on the Toy Society :) I know I'm having fun and can't wait to make my next toy :) Happy Stitching!!!! and NO Ripping!!!!!
Subscribe to:
Posts (Atom)